HP LaserJet P1102W WiFi , HP LaserJet Pro P1102w, P1109w - Wireless Printer Setup
HP LaserJet P1102W WiFi , HP LaserJet Pro P1102w, P1109w - Wireless Printer Setup

This document is for LaserJet Pro P1102w and P1109w printers.
Install the print driver on a computer with Windows or Mac to set up a
wireless connection on your printer.
Setting up the printer on a wireless network (Windows)
Install and connect the printer to your computer over a wireless network.
-
Gather the network name and password.
NOTE:
If you do not know your network name and password, go to Find Your Wireless WEP, WPA, WPA2 Password. -
Make sure you have the USB cable that came with your printer. The USB cable is required to set up your printer on a wireless network.
-
Go to Software and Driver Downloads, type your printer name, and then press Enter.
-
Download the full feature software, and then follow the on-screen prompts to install and set up the printer on a wireless network.
-
When prompted, restart your computer to finish the install.
Setting up the printer on a wireless network (Mac)
Review the steps to set up your printer on wireless network using the HP
Utility software.
Follow these steps to set up your printer on wireless network on a
Mac.
-
Gather the network name and pass-phrase.
NOTE:
If you do not know your network name and password, go to Find Your Wireless WEP, WPA, WPA2 Password. -
Connect a USB cable to the USB port on the rear of the printer
 , and then to the computer.
-
Make sure the printer firmware is up-to-date.Go to Software and Driver Downloads, type your printer name, and then press Enter. Install any available firmware updates.
-
Click the Apple menu, and then click System Preferences.
-
Depending on your operating system version, click Print & Fax, Print & Scan, or Printers & Scanners.

-
Click the name of your printer, and then click Options & Supplies.
-
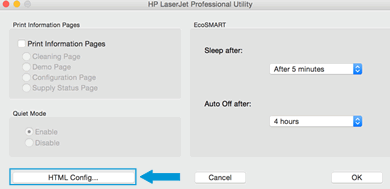
Click Utility, and then click Open Printer Utility.
-
Click HTML Config to open the advanced printer settings window.
-
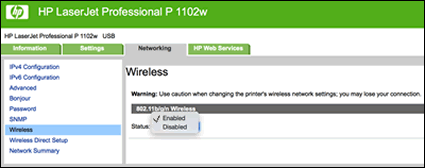
Click the Networking tab, and then click Wireless in the left pane.
-
Click 802.11b/g/n Wireless, and then select Enabled from the pop-up menu.
-
Double-click your network name to add it to the Current Network Name field, enter the network pass-phrase, and then click Apply.

-
Add your network name to the Current Network Name (SSID) field
-
Enter your network pass-phrase
-
-
Disconnect the USB cable from the printer and the computer.
-
In the Printers & Scanners, Print & Scan, or Print & Fax window, click the name of your printer, click the minus sign
 , and then delete the USB-installed printer.
-
Click the plus sign
 , and then click Add Printer or Scanner.
-
Click the name of your printer with Bonjour as the kind, click the Use or Print Using box, and then select the name of your printer in the pop-up menu.
-
Click Add to add the printer to the list.
https://support.hp.com/


Comments
Post a Comment